Private Kubernetes Cluster Setup on Ubuntu 20.04
A comprehensive guide to setting up a private Kubernetes cluster on Ubuntu 20.04, designed for on-premises or cloud deployment. Learn how to configure, deploy, and verify your Kubernetes cluster.
This guide walks you through the process of setting up a private Kubernetes cluster on Ubuntu 20.04. After completing this setup, you'll have a fully operational Kubernetes environment capable of managing containerized applications.
This setup is tailored for private Kubernetes clusters, suitable for on-premises deployments or as a self-hosted cluster on any cloud platform.
Table of Contents
Prerequisites
Before proceeding, ensure that the following prerequisites are met:
- OS: Ubuntu 20.04 (clean installation).
- Hardware: Minimum of 2 CPU cores, 2 GB of RAM, and sufficient disk space per node.
- Network: Static IP addresses assigned to all nodes.
- Access: SSH access to all nodes from the installer machine.
- Permissions: Privileged user with
sudorights. - Internet: Stable connection.
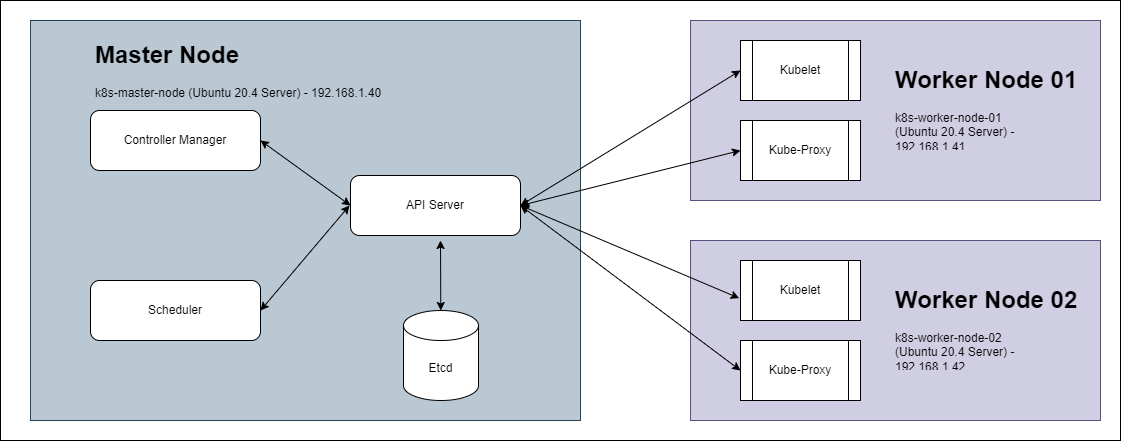
Lab Setup
The cluster will consist of one control-plane node and two worker nodes:
| Node Name | Role | IP Address |
|---|---|---|
k8s-master-node | Control Plane Node | 192.168.1.40 |
k8s-worker-node-01 | Worker Node | 192.168.1.41 |
k8s-worker-node-02 | Worker Node | 192.168.1.42 |
Step-by-Step Installation
1. Set Hostnames of Each Node
Set the hostname on each node using the hostnamectl command.
Commands:
# On the control plane node:
sudo hostnamectl set-hostname "k8s-master-node"

# On worker node 01:
sudo hostnamectl set-hostname "k8s-worker-node-01"

# On worker node 02:
sudo hostnamectl set-hostname "k8s-worker-node-02"Update the /etc/hosts file on all nodes with the following entries:
192.168.1.40    k8s-master-node
192.168.1.41    k8s-worker-node-01
192.168.1.42    k8s-worker-node-02
Verification:
hostnamectl
# Output on the control-plane node:
Static hostname: k8s-master-node2. Disable Swap and Add Kernel Modules
Disable Swap:
- Open
/etc/fstaband comment out any lines with swap entries.sudo vi /etc/fstab - Disable swap immediately:
sudo swapoff -a
Add Kernel Modules:
- Load required modules:
sudo tee /etc/modules-load.d/containerd.conf <<EOF overlay br_netfilter EOF sudo modprobe overlay sudo modprobe br_netfilter - Configure sysctl parameters:
sudo tee /etc/sysctl.d/kubernetes.conf<<EOF
net.bridge.bridge-nf-call-ip6tables = 1
net.bridge.bridge-nf-call-iptables = 1
net.ipv4.ip_forward = 1
EOF

sudo sysctl --system
Verification:
sysctl net.bridge.bridge-nf-call-iptables
# Output:
net.bridge.bridge-nf-call-iptables = 13. Install Containerd Runtime
Install and configure containerd on all nodes:
Commands:
# Install dependencies:
sudo apt install -y curl gnupg2 software-properties-common apt-transport-https ca-certificates

# Add Docker repository:
sudo curl -fsSL https://download.docker.com/linux/ubuntu/gpg | sudo gpg --dearmor -o /etc/apt/trusted.gpg.d/docker.gpg
sudo add-apt-repository "deb [arch=amd64] https://download.docker.com/linux/ubuntu $(lsb_release -cs) stable"

# Install containerd:
sudo apt update
sudo apt install -y containerd.io

# Configure containerd:
containerd config default | sudo tee /etc/containerd/config.toml >/dev/null 2>&1
sudo sed -i 's/SystemdCgroup = false/SystemdCgroup = true/g' /etc/containerd/config.toml

# Start and enable service:
sudo systemctl restart containerd
sudo systemctl enable containerdVerification:
sudo systemctl status containerd
# Output:
● containerd.service - containerd container runtime
   Loaded: loaded (/lib/systemd/system/containerd.service; enabled; vendor preset: enabled)
Active: active (running)4. Install Kubectl, Kubelet, and Kubeadm
Install Kubernetes tools on all nodes:
Commands:
# Add Kubernetes repository:
sudo apt-get update
sudo apt-get install -y apt-transport-https ca-certificates curl gpg
curl -fsSL https://pkgs.k8s.io/core:/stable:/v1.32/deb/Release.key | sudo gpg --dearmor -o /etc/apt/keyrings/kubernetes-apt-keyring.gpg
echo 'deb [signed-by=/etc/apt/keyrings/kubernetes-apt-keyring.gpg] https://pkgs.k8s.io/core:/stable:/v1.32/deb/ /' | sudo tee /etc/apt/sources.list.d/kubernetes.list

# Install tools:
sudo apt-get update
sudo apt-get install -y kubelet kubeadm kubectl
sudo apt-mark hold kubelet kubeadm kubectl

# Enable kubelet service:
sudo systemctl enable --now kubeletVerification:
kubelet --version
# Output:
kubelet version v1.325. Install Kubernetes Cluster
On the control plane node (k8s-master-node):
Commands:
sudo kubeadm init --control-plane-endpoint=k8s-master-nodeSave the kubeadm join command from the output for adding worker nodes.
Post-installation setup for kubectl:
mkdir -p $HOME/.kube
sudo cp -i /etc/kubernetes/admin.conf $HOME/.kube/config
sudo chown $(id -u):$(id -g) $HOME/.kube/config6. Add Worker Nodes to Cluster
Log in to each worker node and run the kubeadm join command saved from Step 5:
Example:
sudo kubeadm join k8s-master-node:6443 --token <token> --discovery-token-ca-cert-hash sha256:<hash>Verification:
kubectl get nodes
# Output:
NAME                  STATUS   ROLES                  AGE   VERSION
k8s-master-node       Ready    control-plane,master   1m    v1.32
k8s-worker-node-01    Ready    <none>                30s   v1.32
k8s-worker-node-02 Ready <none> 30s v1.327. Deploy Calico Pod Network Add-on
On the control plane node:
kubectl apply -f https://raw.githubusercontent.com/projectcalico/calico/v3.26.1/manifests/calico.yamlVerification:
kubectl get pods --all-namespaces8. Test and Verify Kubernetes Installation
Deploy an Nginx deployment:
kubectl create deployment nginx-web --image=nginxScale the deployment:
kubectl scale --replicas=4 deployment nginx-webExpose a pod via NodePort:
kubectl run http-web --image=httpd --port=80
kubectl expose pod http-web --name=http-service --port=80 --type=NodePortVerify NodePort:
kubectl get service http-serviceAccess the application using the node IP and NodePort.
Conclusion
Congratulations! You’ve successfully set up a Kubernetes cluster on Ubuntu 20.04. Your cluster is now ready to deploy and manage containerized applications. Explore further Kubernetes features to unleash its full potential.